Pages

Tuesday, January 31, 2012

Snowflake Dancing


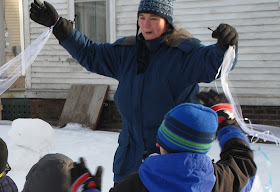
No winter would be complete without some Snowflake Dancing. Here's a silly picture of me leading my preschool group. To make the dancing more expressive I made a simple snowflake dancing ribbons for the entire class.


This simple & frugal craft was made with tulle and curling ribbon looped onto a rubber band. The rubber bands could be slipped over the kids mittens so they didn't have to hold anything & could just focus on dancing!


Here's our class set. Made in just a few minute and cost just a few dollars to make!

Happy Snowflake Dancing to you!

Snow Themed Snacks

Here's a recap of the cute snow inspired snacks we had over the last month! My kiddos love having themed food and I love sneaking in some extra fruits & veggies into snack time.

Igloo Snack - slice an apple in half and carefully take out the seeds by cutting the away the middle portion. Lie it on the plate with the cut side down. Cover with a sticky substance, we chose peanut butter since it has some nutritional value. (Fluff or Cool-whip would be white and possibly look nicer but neither are healthy choices.) Give the child a small bowl of mini marshmallows to create their own igloo. I wanted my kids to share one igloo so I pre-cut it into slices before spreading the peanut butter. Both kids LOVED this snack and it was voted the best of the snow snacks I made this month!


Igloo made Vermont Style (a.k.a. Cabot Cheese House) To make, I laid down a small glass bowl to act as the base. Then I sliced the best cheddar cheese in the world. To build, I started at the bottom and worked my way to the top. My kiddos liked this igloo almost as much as the marshmallow one, can you believe that? It came in a very close second place.


Snowman Lunch Scapes - I used cucumber slices for three snowballs of the snowman, and carved a simple cucumber hat. I made the arms and nose from a carrot by slicing them to size. Raisins for eyes and buttons. Since I was making lunch - I cut a sandwich into fourths and laid it at the bottom of the plate as the snow that the snowman would stand on.


Tortilla Snowflake - fold a flour tortilla into fourths and cut away a few sections to make a snowflake. Warm in an un-oiled frying pan then sprinkle with cheese. Serve with salsa or bean dip. I saved the scraps and microwaved them until they were crispy, so nothing went to waste!


Hard Boilded Egg Man - cut the eggs in half and arrange on a plate. Add carrot noses and raisin or chocolate chip eyes & buttons. For a snowy base we used oyster crackers. Turning one egg upside down and filling with peanuts was cute idea my son thought of!


Apple Snowflake- arrange six slices of apple in a snowflake shape. We added craisins to the center but a little bowl of yogurt or peanut butter would be fun to dip into! My son pointed out that this did not really resemble a snowflake but it was eaten despite being 'not-so-cute'!

Cheesy Snowman - lay circular pieces of cheese (provolone is our favorite). Add a mini carrot nose, raisin or cheerio eyes & mouths, grapes sliced in half for buttons, and pretzel stick arms.  We made a full snowman body with our cheese slices but just one slice of cheese for snowman face would be fun too!

Why can't I rotate this pic...hmm?

Snowman "Open Face" sandwich - either a bagel half, rice cake, English muffin, or slice of bread cut into a circle. Lay on either lunch meat cut to size or spread with a topping such as cream cheese or peanut butter. Add features for the face with whatever fruits or veggies your kiddos would enjoy! Use just one circle as head or two as a head and body if you want a heartier snack or a lunch. This idea could be made into a breakfast version as well!


Snowman Breakfast - make silver dollar pancakes and serve three small pancakes arranged as a snowman. Another less labor intensive option is to use a snowman cookie cutter. Serve a small bowl with raisins, craisins, fruit slices, etc. for your kiddos to decorate their own pancakes. And don't forget to serve Vermont Maple Syrup for a true feast!

Cracker Man - three circular crackers spread with flavored cream cheese, pretzel stick arms, veggie features! Easy and super cute. This would be easy to serve to a large group of kids.


Snowman Noses - just a really cute way to say we are eating raw carrots. I sent some in my son’s lunch box and wrote on the Ziploc, “Uh oh, some snowman is now missing his nose!” (Six year olds like that kind of humor!)


Banana Man - three circles of banana, peanut butter for buttons & facial features, mini pretzel sticks for arms. Anything with peanut butter and banana is a favorite in this house hold. This could be made with honey if PB was an allergy concern.


On the list still to make:


Snow Ice Cream : 1 Cup milk, 1/2 Cup sugar, 1 teaspoon vanilla extract, 6 cups of clean and fluffy snow. (Put out a clean bowl and gather a batch of freshly fallen snow to use.)

Mix together milk, vanilla, and sugar. Stir until the sugar dissolves. Slowly add the snow, stirring constantly, until it is thick or a consistency you like. I am thinking of making "Cold Cocoa Snow Cream" so we’ll add 2 T. cocoa powder, 1/4 C chocolate chips, and a sprinkle of mini marshmallows on top!


Shaved Ice Snow cones - kind of chilly for us to make right now, but I know the kids would love to make these! Maybe I'll revisit some of these snow themed snacks this summer for Winter in July?


After reading Snowmen at Night, I want to make iced cocoa (i.e. chocolate milk). The book mentions that the snowmen drink iced cocoa and that can lead into a great chat about why snowman can't drink hot cocoa. Then have a taste test, Hot Cocoa vs. Chocolate Milk, and make a simple graph.


Some more yummy snow themed snack ideas on-line:


Lots of winter themed snacks available here:
http://www.kidactivities.net/post/Winter-Snacks-and-Fun-Food-for-Kids.aspx

Ice Cream Snowmen - http://teaching2and3yearolds.blogspot.com/2012/01/ice-cream-snowmen.html


Mixed Up Snowman Snack - http://www.gourmetmomonthego.com/2010/12/ive-been-crazy-busy-lately-and-it-has.html

Snowflake Catcher Necklaces


I had this brainstorm last year when I was outside with my son. We were trying to catch snowflakes on black felt and black construction paper but they kept blowing in the wind. My son had his mittens on so he was even more frustrated by not being able to hold the paper well. That's when it hit me ---"Snowflake Catcher Necklaces"!

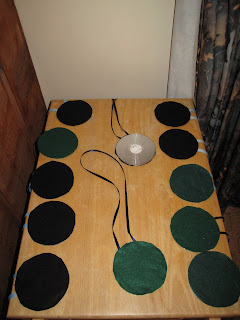
I wanted something that could hang around his neck so when he lost interest it could just hang there. I also wanted it to be firm enough that it wouldn't fold or bend. I decided an old CD with a ribbon attached could fit this purpose.
To make them I covered one side with dark colored felt. The felt works well because it's fuzzy texture kind of makes the snowflakes stand up so you can view it from multiple angles. I also made sure that the ribbon was long enough to easily fit over a hood or hat since these will be used while we have our big winter coats on.

For the reverse side of the snowflake catchers I have made a couple of different versions:
* For some I added a felt pocket where a magnifying glass could be stored. To make it more portable, I attached a plastic magnifying glass onto another ribbon so it would all stay together. (This option proved a little hard for 3 year olds to operate though.)
* Another idea was to draw a few types of common snowflakes to use as a quick reference.
* My favorite choice for preschoolers is to the leave the back side blank so they have a "mirror". They like to check themselves, especially if they are trying to catch falling snowflakes on their tongues! This mirror would also be fun to show them how to make reflections with the sun and send an S.O.S. message!
Class set for my preschoolers...now if only we could have a nice snowfall!

Happy Snowflake Catching! Be sure to check out my other related post here for more snowflake info!
~April

Monday, January 30, 2012

Groundhog Craft


There are tons of groundhog crafts on-line but I think my version is cute enough to share.

Simply decorate a toilet paper tube to match the seasons that Phil could predict. Glue light blue or white felt onto one side to represent "six more weeks of winter". Then glue green felt with snips on top to symbolize grass and spring.

For the puppet, copy a small groundhog onto card stock. Have the kids cut it out and color and then attach to a stick. A chop stick would work better but all we had was popsicle sticks. For added durability, laminate the groundhog or cover with box tape.

Voila...a cute little groundhog craft that encourages pretend play about the seasons!

(Sorry I don't have a printable groundhog to share. The one I used was copyrighted.)

Thursday, January 26, 2012

Tot School Update - 32 months

And so begins our monthly "Tot School" updates for 2012.

"The Queen" is 32 months old and is excited to learn new things each day. I have committed to blogging once a month about our learning adventures.
My focus for our "Tot School" will be on early literacy & math skills, sensory activities, seasonal crafts, nature experiences, and if I can get my act together - tot trays. I have the best intentions with setting up tray activities but haven't quite been consistent with it!
Reflecting on things the Queen is doing now:
  • Letter Identification - identify 20/26 upper case letters. Can identify 9/26 lower case letters, all which happen to look identical to their capital letter counterpart (c, o, s, w, u, p, z, x, v).
  • Letter Sounds - Has associated a person's name with almost every letter of the alphabet! Often tries to 'sound out' words that she's reading but starts every word with the /p/ sound. It's so cute but I refrain from laughing because she clearly is focused and working hard!
  • Numeral Identification - can id numbers 1-9 but sometimes confuses 2 as a 1 or 5.  
  • Matching numerals - is OBSESSED with playing UNO and is very proficient at matching Uno cards 0-9. Insists on playing Uno 3-4 times daily and has a fit if she doesn't get a Skip card in her hand! 
  • Counting -counts orally to 12. Can count a set of objects to 4. Has 1:1 correspondence to 4. 
  • Reading - pretend reads many of her favorite books. I read aloud to her at least 30 minutes a day and she listens as her brother reads aloud.  She will browse her board book collection in her crib in the morning and will often pick a couple of books, "Me read this one." 
  • Colors - knows all the rainbow colors and pink, black, and white.
  • Shapes - names and id all the basic shapes, often forgets the word rectangle. Can sort shapes by more than one characteristic (i.e. sorts all the squares and then sorts by size or color)
  • Fine Motor - had lots of fun this month with beading pipe cleaner snowflakes. Can independently put hair ties onto her door knob. Has begun to snip with scissors but still developing the proper grip for scissors and pencils.
  • Gross Motor - began swim lessons this month and I've been impressed with how she follows directions. Keeps up with active games with her brother. Refuses to go sledding and prefers to play games indoors.
  • Behavior - testing her limits and has gotten really good at pouting out her bottom lip, folding her arms across her chest, and saying "Hmmph." Her second favorite saying is "It's not fair." Overall though she is a happy go lucky kid most of the time.
  • Art - her favorite activity has been doing stickers. I had several fun winter crafts planned but she prefers her own projects and not something I've prepped for her. Much of our 'art' time is spent with her in my craft room reorganizing and looking for things she wants. (I need to make that space more kid-friendly since both the kids like to play in there. It was my big project for the month but it's taking me way too long to finish.)
  • Crib - the Queen is still in her crib. Hoping she stays there for as long as possible.
  • Potty training - still in diapers...need to focus on this ASAP!
  • Communication - I can understand 95% of what she says. She often will ask in multiple ways if someone doesn't understand her.
Next month's focus for the Queen:
Potty Training
Fine Motor work
Letter sounds 
Pick a few lower case letters to match to capitals
Open ended art
More sensory experiences
Next month I promise to make this post a bit cuter with pictures!

Wednesday, January 25, 2012

Tot School 2012!

"Tot School" is a term that many homeschoolers use to describe their work with their toddlers. Tot School is not an actual school and the purpose is not to push 'academic' skills but rather to have fun learning early skills.

For us, "Tot School" is a focused time that I spend each day with my 'tot' -- a.k.a. "The Queen"! I was inspired by this website - http://www.1plus1plus1equals1.com/TotSchool.html  to start "Tot School" around this time last year. I had big plans of doing a weekly blog post about our progress but I never could seem to get into the rhythm of a weekly post.

We did "Tot School" throughout 2011 and had lots of fun learning and playing together. She and I both look forward to this one-on-one time!

I decided that I could get a bit more organized in 2012, and commit to doing a monthly blog post about our Tot School adventures. The Queen is at an exciting time of growth and change. The monthly post would help me remember these special moments & will help me reflect on where we are going. These posts would also be fun for my family who live far away to stay connected!


So what do we do during our tot time? We do a variety of fun play activities. It's a special one-on-one time that I dedicate just to her. Though I usually have a plan about what I want to work on, I follow her lead. Sometimes it's just a tea party and other times it's more structured.

When is tot time? I find this time when my older son is at school or when he is engrossed in a project with my husband. I try to drop everything else and get onto the floor and focus just on her. I know that I did better job of this when I had just one child...but we get in as much tot time as we can! We are not a homeschooling family but we do lots of 'homeschooling' types of activities with both of our children!

The Queen will be three in May, and will begin preschool in the fall. I am excited that she will be in my classroom, and that will be a whole new adventure in itself! But until then...on to Tot School 2012!
This weekend I will do our first post of the year...I know I can do this! ;)

Wednesday, January 11, 2012

Snowflake Catching Day

"Under the microscope, I found that snowflakes were miracles of beauty; and it seemed a shame that this beauty should not be seen and appreciated by others. Every crystal was a masterpiece of design and no one design was ever repeated." ~William Bentley


It has been a virtual snow-less winter here in Vermont. Who wants to live in the cold without all the fun of playing in the snow?
We are under a Winter Advisory from 4 am - 7 pm tomorrow, so I've got all my fingers and toes crossed that we get a HUGE amount of snow.
Granted shoveling the driveway is no fun...but building snowmen, sledding, snowball fights, and snow angels with the kids make it all worthwhile!

The best days to catch snowflakes are when we the snow is falling with big fluffy flakes. So I'm not sure what the snow will be like tomorrow but I'm hoping that it's a good snowflake day.

In the winter, we keep a couple of pieces of dark colored felt and hand lens in our unheated garage for when the moment strikes to catch snowflakes. My son knows where I keep them so sometimes he goes and grabs them when he's outside playing. You could also use black construction paper, but I find the flakes kind of stand up against the hairy texture of the felt. (In a pinch, you can also just use a dark colored glove, like in the photo above.) Whatever you use, just make sure that your landing surface is cold. So store your felt or construction paper in the freezer or in an unheated garage.

I have also made some pretty cute "Snowflake Catcher Necklaces" for my preschool class.  To make them I took old CD's and covered one side with dark colored felt. On the other side I drew examples of a few types of common snowflakes and made a pocket to store a small magnifying glass.  I added a long ribbon so it could be worn as a necklace. I'll try to post about that this weekend ~ hopefully with some action shots of us using them!

In previous 'snowflake catching days' we made the discovery that if you catch the flakes on the cloth then view it while standing under the sled, that more flakes don't drop onto the cloth and disrupt what you're viewing. 

On 'snowflake catching days' you must read the book, Snowflake Bentley, which tells the story of a Vermont man that dedicated his life to studying and photographing snowflakes under a microscope. If you haven't read this book, you really should!

A great website to learn more about snowflakes is listed below. Be sure to print out a copy of their "Snowflake Guide", slip it into a plastic sleeve, and take it outdoors with you on the next snowy day!   
 
 
Happy Snowflake Catching!
I'd love to hear about your snowflake adventures.

Friday, January 6, 2012

Owl Snacks

At Nature Preschool we are learning that owls eat mice, voles, shrews, rabbits, flying insects, fish, and even snakes. None of those sound too appetizing to us but "Owl Shaped Snacks" sure do!


These little guys were made from Thomas English bagel thins, spread with peanut butter, banana slices & raisins for eyes, and a triangle of cheese for the beak. The fun part was explaining to the preschoolers that the beak could be 'opened' and they could feed their owls grapes. (Cream cheese could be substituted for the peanut butter if there were allergies.) The kids loved feeding their owls and almost everyone ate their entire owl too! (Peanut butter balls shaped like mice with almond slices for ears would be fun to add to this snack too!)

Another day one of the Nature Preschool parents made this owl shaped snack that was also well liked by our preschoolers.
She used rice cakes as the base. Ritz crackers and olive slices held on with cream cheese. A triangle of cheese for feather tuft and a thin slice of carrot shaped like a beak. How cute!!!


Some other fun Owl Snacks might include:

Owl Pizza - using English muffins or dough shaped into rounds, decorate with pizza toppings cut into owl face shapes.

Owl Pellets - make rice crispies but hid a small treat inside and shape into ovals to look like owl pellets. Kids have to dissect to find the snack hidden inside!


Lunch meat, cheese, Ritz cracker idea from here - http://www.makinglearningfun.com/t.asp?b=m&t=http://www.makinglearningfun.com/Recipe/RecOwl.gif

Owl Cupcakes - http://almostunschoolers.blogspot.com/2010/08/owl-cupcakes.html

Night Owl Cookies - http://www.brightideas.com/bright_idea.aspx?ID=128

Owl Inspired Art

Owl Art ~ There are so many fun art activities on the web for making owls that I had a hard time choosing which to do! Since I am making these with my daughter at home (2.5 years old) and with my preschoolers (3-5 year olds), I wanted to focus on simple and engaging projects. Here's what I decided to create!


Paper Bag Owl Puppets - using small brown lunch bags & pre-cut shapes from construction paper. I used an owl puppet my son brought home from his preschool as a sample but want to make it a bit more open ended so we also offered a variety of construction paper and supplies. If a child wanted to make their owl a bit different than the sample they were encouraged to be creative.

I also made a bigger owl puppet for 'just the teachers' at Nature Preschool to use. To make this Great Horned Owl I used a dessert sized paper plate, a brown lunch bag for the body, and cut out wings from another brown lunch bag. His head is mounted to a paint stirrer so I can turn his head around.

I made another set of paper puppets to do a puppet show for the preschoolers. To make these puppets I photocopied mice and owl pictures and mounted them onto corrugated cardboard. Then inserted either a paint stirrer or dowels. These are easy and virtually no cost and the kids LOVE to play with them. Since they're paper they only last a couple of months but the effort is worth it!


Felt Owls - children will assemble their own owls using pre-cut felt shapes. We can add either a magnet or a safety pin, or if you are feeling really crafty...sew on a back to make them into finger puppets. Another no sew idea would be to hot glue the finished owls onto Popsicle sticks to make another type of puppet. (I think I'm really into puppets this week!)
Example of the pieces that the children were given.


These on the green tray are one's that my daughter and I made together. She liked picking out the colors but the fabric glue was too difficult for her to squeeze so I had to be the official glue-girl! At preschool we opted to use white glue so the kids could make them more independently.

To see another more version of Felt Owl Puppets (i.e. someone willing to sew), check out this blog- http://www.thegreenwife.com/2010/01/01/owl-party-favors-a-tutorial-and-a-giveaway/


Mouse Finger Puppets from old knit gloves. Cut the fingers from gray or brown knit or cotton gloves. Each finger will become a mouse finger puppet. Kids add details by gluing on felt or foam pieces for the mouse tail, ears, eyes, nose. Be sure to insert a small piece of cardboard into the fingers so that the glue doesn't make it impossible to insert their finger when dried. I haven't made these yet but will try to remember to upload a picture when I do!
Owl Collages - For several days the preschoolers had an 'owl nest sensory bin'. This bin was filled with a variety of scrap paper in neutral colors and several pair of scissors. The scraps will then be used to make collages of owls.
Cut out an owl shape from construction paper.  Provide watered down glue & small paint brushes. Have pictures of real owls for the children to refer to as they collage. When all the 'feathers' are added, give the children "owl eyes and beaks" to add. Also offer 'branches' cut from brown construction paper.
Mount the owl shape and the branch to an over sized piece of black construction paper. Some children may also like to add stars to the night sky. After the collage is dried, I plan on adding a coat of Mod Podge to make the owl feathers secured and give it a shine!
(these aren't done yet but I'll upload a photo next week!)

Owl Pattern Block - I just love pattern blocks and have blogged about them in more detail HERE. I searched the web for an owl template and found this site: www.kellyskindergarten.com/math/downloads/patternblocks   This free owl template uses the same sized blocks as my Melissa & Doug pattern blocks.


Easel Art Strip - I like printing out these from the website www.makinglearningfun.com - They help me draw animals better and I use them as a guide for cutting out animal shapes as well. I glue them onto sentence strips and cover with box tape to help protect them. Then I leave them at our writing center at home for the my kids to use as a model to draw.


Owl Paintings - cut shapes of owls from oversized paper. Let kids paint it at the easel - use feathers instead of brushes if you're feeling brave. For eyes you could glue two toilet paper tubes together to let the kids dip in yellow paint and then stamp eyes onto their owl.

I've got some fun ideas for Owl Snacks over here at this post: http://primarylearninglogs.blogspot.com/2012/01/owl-snacks.html

Other fun owl art projects could include:
Owl Homes from Oatmeal Containers
Owl Puppets - using toilet paper tubes. It would be fun to have little mice for the owls to eat.
Crayon melt art using an old electric frying pan and a line drawing of an owl.
Owl Eyes Opera glasses (Knee High Nature) - compares the size of our eyes to owls' eyes
Owl & Mice Masks
Owls made from the kids handprints - http://www.preschoolplaybook.com/2009/09/handprint-hoot-owl.html
Owl Mobile that would be nice to decorate the classroom - http://www.skiptomylou.org/2010/09/30/printable-owl-mobile/
Tuesday, January 3, 2012

Paint Chip Snowman

I'm on a mission to clean out my craft room. So I'm planning lots of winter craft projects to keep the kids busy. First up, come up with projects to use the stack of paint chips I've been collecting!

I pre-cut a few for my 2.5 year old and have a bunch of paint chips for my six year old to cut himself. Maybe we'll have a whole community of snowmen!

Now to figure out what kind of markers will work on the waxy surface....or maybe I'll put out a bunch of scrap paper for them to glue on decorations. I'll come back an add another picture to this post once the kids have decorated them!


We live in Vermont and this is the best snowman we can make today!